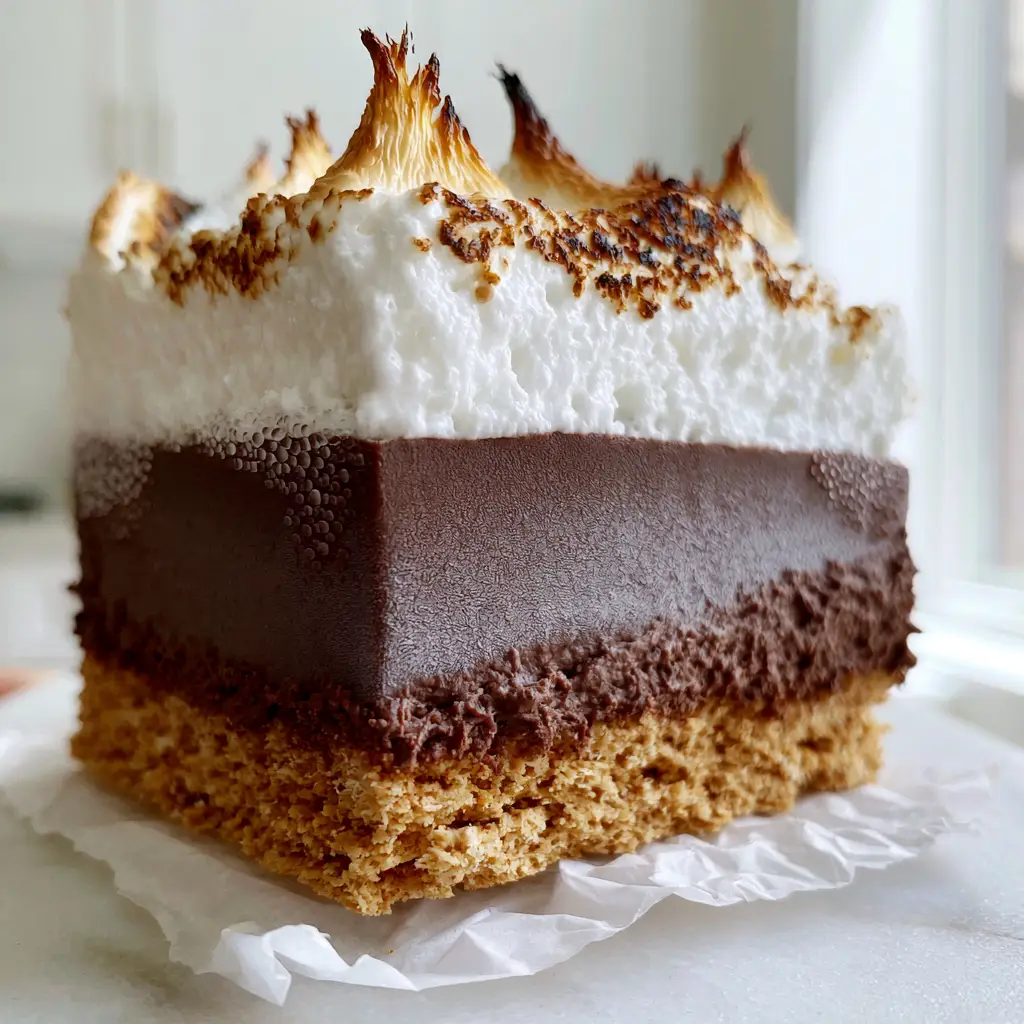
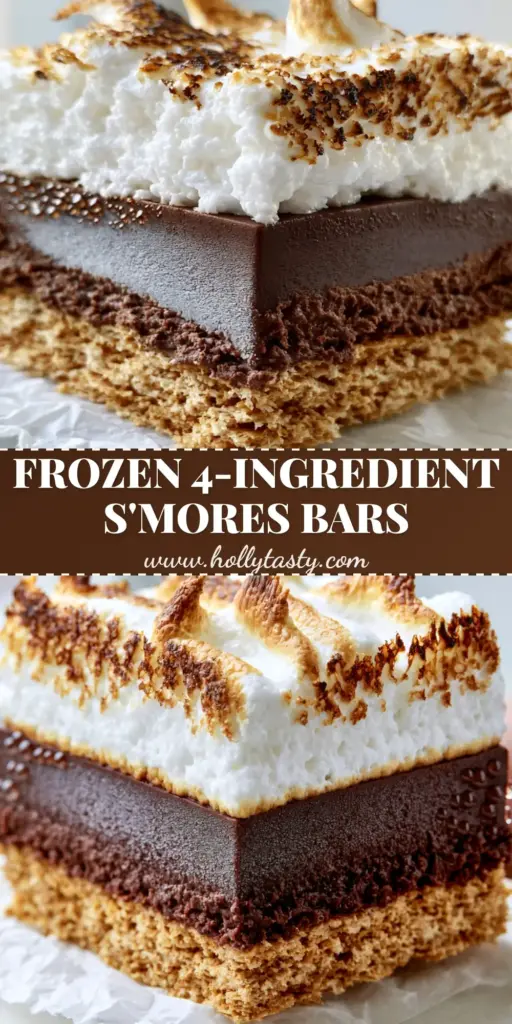
When the heat of summer hits, nothing satisfies the craving for a nostalgic campfire treat quite like these Frozen s’mores. Imagine biting into a thick, handheld bar where a buttery, pressed graham cracker crust meets a dense, frosty dark chocolate ganache, all crowned with a cloud of marshmallow fluff featuring perfectly charred peaks.
This isn’t your childhood backyard s’more that leaves you sticky and covered in soot. This is a sophisticated, thermally-balanced dessert designed for the modern palate, emphasizing professional textures and high-contrast visuals that look as good as they taste.
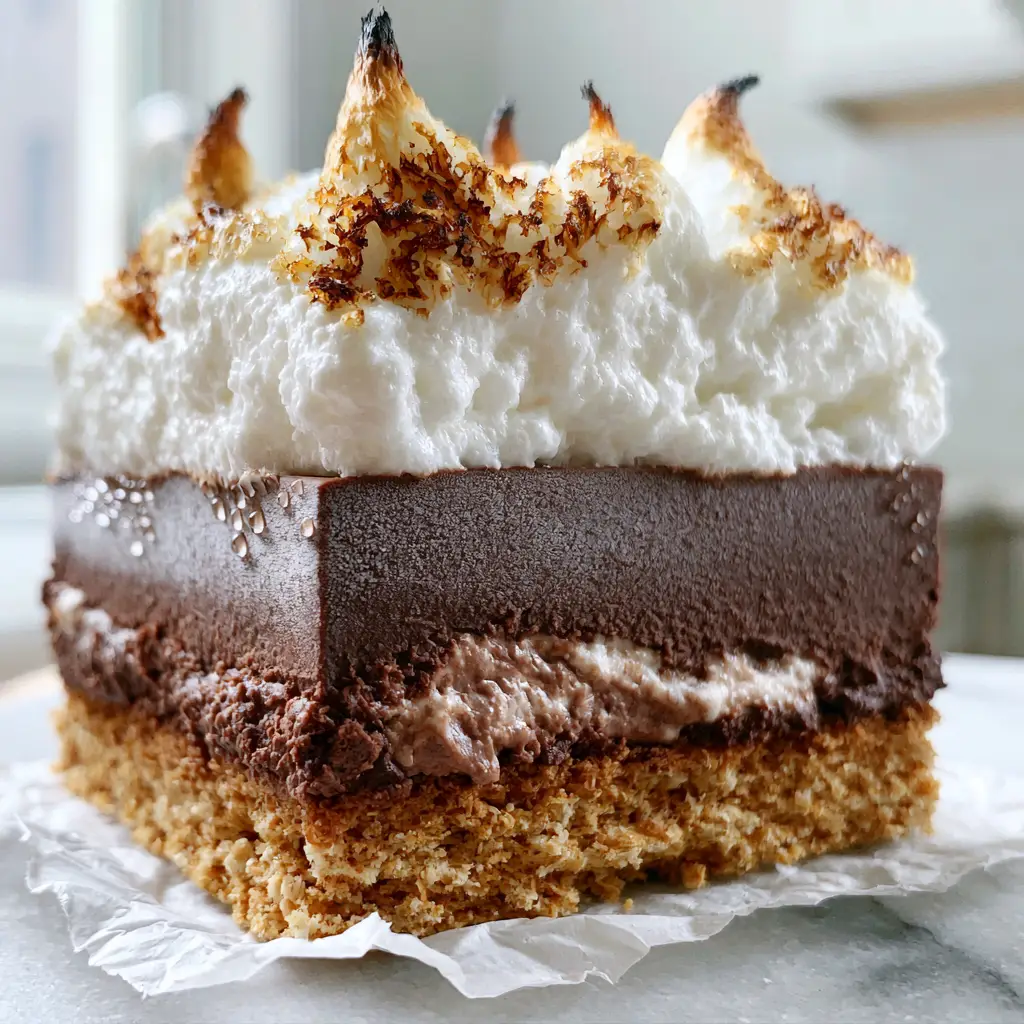
The beauty of the Frozen s’mores lies in the structural integrity of its three distinct, perfectly straight layers. From the macro-texture of the golden crust to the micro-condensation droplets that form on the side of the chilled ganache, every element is a study in culinary precision.
Why This Layered Frozen S’mores Recipe Works
- Triple-Texture Contrast: You get the crunch of the graham cracker, the fudge-like density of the chilled ganache, and the airy stickiness of the toasted fluff.
- Perfectly Straight Layers: By using professional freezing intervals, we ensure that the dark chocolate and marshmallow remain distinct, creating a stunning visual profile.
- Heat Without the Melt: We utilize a kitchen torch to achieve those signature charred peaks without compromising the frozen interior of the bar.
- Naturally Photo-Ready: The matte finish of the dark chocolate against the snowy white marshmallow makes this the centerpiece of any summer gathering or no-bake summer dessert platter.
The Anatomy of a Professional Frozen S’mores Bar
To achieve the result seen in our visual blueprint, we must select ingredients that behave correctly at sub-zero temperatures. Not all chocolate freezes with that beautiful matte finish, and not all crusts remain biteable when chilled.
The Foundation: Golden Graham Cracker Crust
We use 2 cups (200g) of finely crushed graham cracker crumbs mixed with 6 tbsp (85g) of melted salted butter. The salt is crucial; it cuts through the sweetness of the subsequent layers and ensures the crust doesn’t turn into a rock in the freezer.
The Core: Chilled Dark Chocolate Ganache
This isn’t a simple pudding. We use 12 oz (340g) of 60% cacao dark chocolate chips and 1 cup (240ml) of heavy cream. A tablespoon of light corn syrup is our “secret” ingredient—it prevents the chocolate from becoming too brittle, ensuring it keeps its fudge-like consistency even when frozen.
The Crown: Toasted Marshmallow Fluff
While you can use store-bought fluff, we recommend a stabilized marshmallow cream. If you are serving these as cold appetizers at a party, the stability of the fluff ensures the peaks don’t collapse before your guests can take a bite.
Essential Tools for Success
To get those “razor-sharp” focus-worthy layers, you need more than just a spoon. A 8×8-inch (20cm) square baking pan lined with parchment paper is non-negotiable for easy removal and clean edges.
An offset spatula is your best friend for smoothing the ganache into a perfectly level surface. Finally, a culinary butane torch is required to get the charred, golden-brown peaks on the marshmallow without melting the chocolate layer beneath it.
How to Build the Perfect Frozen s’mores Layer by Layer
Phase 1: Pressing the Golden Base
Start by lining your pan with parchment paper, leaving an overhang on two sides to act as “handles.” Mix your crumbs, butter, and 2 tbsp (25g) of sugar until it feels like wet sand. Press the mixture firmly into the bottom of the pan using the flat bottom of a measuring cup.
Visual Cue: You are looking for a “pressed golden graham cracker crust” that is 100% level with no loose crumbs. Freeze this layer for 15 minutes before adding the chocolate to prevent the crumbs from migrating into the ganache.
Phase 2: The Frosty Matte Ganache Layer
Heat your heavy cream until just simmering, then pour it over the dark chocolate. Let it sit for 5 minutes before whisking from the center outward until glossy. Pour the ganache over the chilled crust and use your offset spatula to smooth it into a “thick, dark chocolate fudge” layer.
Technique Tip: Tap the pan firmly on the counter three times to release any air bubbles. Freeze for at least 2 hours until the surface has a “slight frosty matte finish.” This is when those “tiny droplets of condensation” will begin to form once exposed to room temperature.
Phase 3: The Toasted Marshmallow Peaks
Once the chocolate is set, spread your marshmallow fluff over the top. Use the back of a spoon to pull upward, creating the “snowy white marshmallow fluff with toasted golden-brown charred peaks” described in our blueprint.
Use your kitchen torch to lightly brown the tips. Do not use the broiler, as the heat will penetrate the chocolate and ruin the straight-layer aesthetic. Finish with a “light dusting of graham cracker crumbs” for that final textural pop.
Pro Tips for High-Definition Results
The Clean Cut: To get the “perfectly straight layers” shown in the macro photo, dip a sharp knife in boiling water and wipe it dry between every single cut. The heat from the blade will glide through the frozen ganache without dragging the marshmallow into the chocolate.
Managing Condensation: The “micro-condensation droplets” are a natural result of the cold chocolate meeting the warm air. To maximize this visual, let the bars sit at room temperature for exactly 3 minutes before serving. This enhances the “creamy chocolate interior” texture.
Flavor Variations: If you love a salty-sweet combo, consider pairing these with churro saltine toffee crumbles on top, or serve them alongside a refreshing lemonade puppy chow for a full dessert spread.
Storage and Make-Ahead Instructions
These Frozen s’mores are the ultimate make-ahead dessert. They can be stored in the freezer for up to 2 weeks. However, for the best visual experience, wait to torch the marshmallow fluff until just before serving.
Keep the bars wrapped tightly in plastic wrap once they are fully frozen to prevent freezer burn. If you have leftovers from a summer BBQ where you served corn dip and burgers, simply pop them back into the freezer in an airtight container.
Pairing Your Frozen Treats
Because these bars are rich and decadent, they pair beautifully with lighter, acidic sides. Try serving them after a meal of chickpea feta avocado salad or a crisp cucumber ranch salad to cleanse the palate.
For a full “S’mores Night” experience, you can even serve smaller bite-sized versions alongside ricotta pistachio honey bites for a sophisticated dessert board.
Frequently Asked Questions
While a torch is best for the ‘charred peaks,’ you can briefly place them under a high broiler. However, be careful! The heat can quickly melt the frozen chocolate layer and ruin the straight-edge look.
The secret is freezing each layer individually before adding the next. This prevents the marshmallow from bleeding into the chocolate, resulting in that professional macro-photo look.
When stored in an airtight container, these bars will stay fresh and delicious for up to 2 weeks. For the best texture, let them sit at room temperature for 3-5 minutes before eating.
A 60% cacao dark chocolate is ideal. It provides a sharp flavor contrast to the sweet marshmallow and maintains a beautiful ‘frosty matte finish’ when frozen.
The ‘micro-condensation droplets’ are a result of the cold ganache hitting the humid air. This is actually a sign of a perfectly chilled bar and adds to the visual appeal of the dessert!
The Official Frozen S’mores Recipe
Frozen s'mores: The Ultimate Layered Dark Chocolate and Toasted Marshmallow Bar
Ingredients
Equipment
Method
- Mix graham cracker crumbs, melted butter, and sugar. Press firmly into a parchment-lined 8x8 pan. Freeze for 15 minutes.
- Heat heavy cream until simmering; pour over chocolate chips and corn syrup. Let sit for 5 minutes, then whisk until smooth. Pour over the crust, smooth with a spatula, and freeze for at least 2 hours.
- Spread marshmallow fluff over the frozen chocolate. Use a spoon to create peaks. Use a kitchen torch to char the tips until golden brown.
- Dust with remaining graham cracker crumbs. Use a hot knife to slice into 16 bars. Serve immediately to enjoy the micro-condensation and creamy interior.
Notes
Torch the marshmallow just before serving for the best visual appeal.
Join the Tasty Community!
We hope you love these Frozen s’mores as much as we do! The combination of the charred peaks and the frosty ganache is a summer game-changer. If you make this recipe, please leave a comment below and tell us how yours turned out.
Don’t forget to take a photo of your perfectly straight layers and share it with us by pinning this recipe to your favorite boards on Pinterest. For more summer inspiration, check out our latest recipes for the sun-drenched days ahead!