The no bake oreo dessert is the undisputed champion of the “lush” dessert world, offering a decadent, multi-textured experience that requires absolutely zero oven time. Imagine dipping a silver spoon into a chilled glass bowl, breaking through a cloud of whipped cream to reach a velvety vanilla bean mousse and a dark, buttery cookie crust.
This isn’t just a simple pudding; it is a meticulously layered masterpiece designed for those who crave the deep, nostalgic flavor of chocolate sandwich cookies. The contrast between the coarse chocolate chunks and the silkiness of the cream cheese creates a sensory experience that feels both sophisticated and comforting.
Whether you are hosting a summer backyard bash or simply need a late-night sweet fix, this dessert delivers high-impact visual appeal with minimal effort. The vertical layers, visible through clear glass, make it a show-stopping centerpiece for any table.
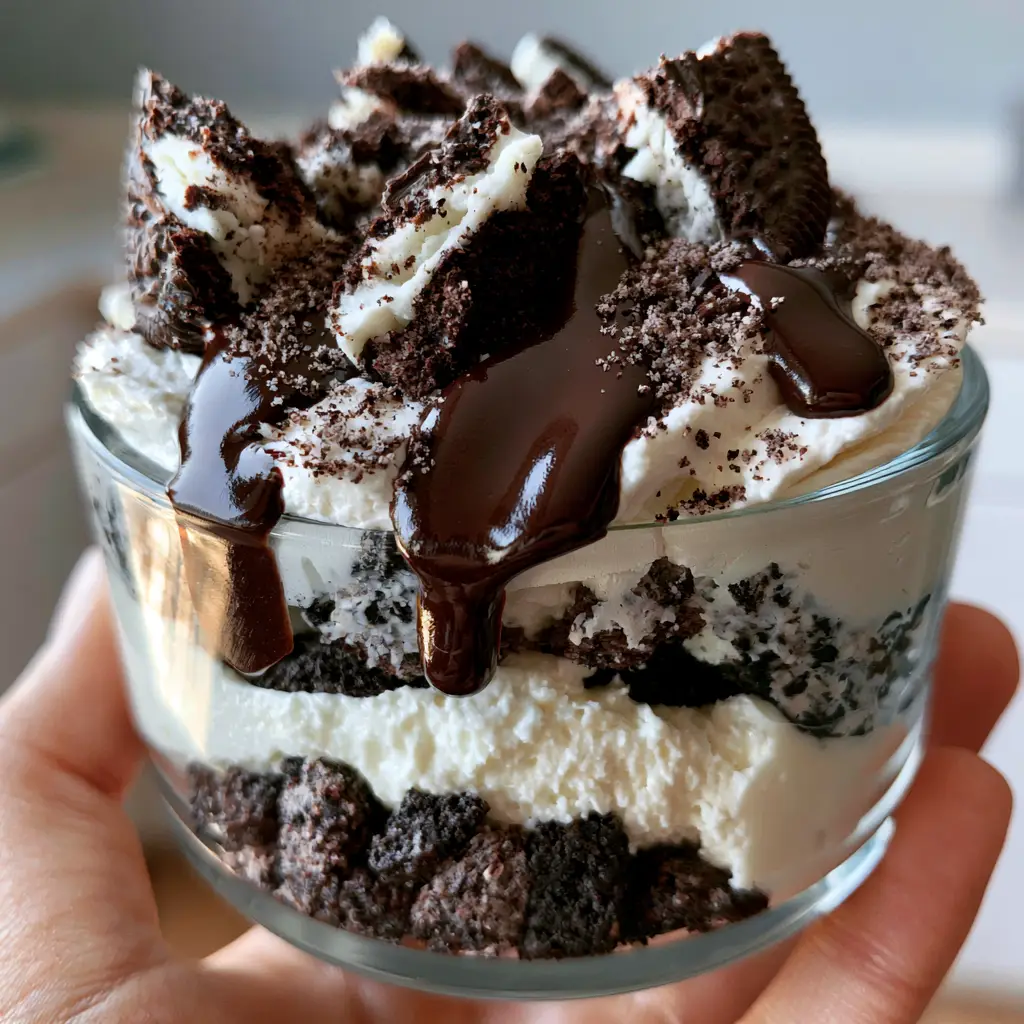
Why You Will Obsess Over This No-Bake Oreo Masterpiece
- Textural Harmony: You get the crunch of coarse-crushed cookies paired with the airy lightness of a whipped mousse.
- Visual Sophistication: The distinct vertical layers and vanilla bean specks provide a “gourmet” look that belies how easy it is to make.
- Make-Ahead Convenience: This no bake oreo dessert actually tastes better after chilling, making it the perfect stress-free entertaining option.
- The “Gloss” Factor: A final drizzle of dark chocolate ganache ensures every serving looks like it came from a professional pastry kitchen.
The Secret Elements for a Perfectly Layered Oreo Lush
Every ingredient in this no bake oreo dessert serves a specific structural or flavor purpose to ensure the final dish matches the professional “lush” standard. We aren’t just using “stuff in a bowl”—we are building a foundation of flavor.
Oreo Cookies (36 Count): You will need a full standard pack to create the three distinct cookie textures: the coarse base, the large garnish chunks, and the fine decorative dust. The dark cocoa flavor provides the essential bitterness to balance the sweet cream.
Unsalted Butter (4 tbsp / 56g): Melted butter acts as the “glue” for the bottom layer, ensuring the coarse cookie chunks hold their shape when sliced or scooped. Using unsalted butter allows you to control the exact seasoning of the crust.
Cream Cheese (8 oz / 225g): Ensure your cream cheese is completely softened to room temperature to avoid lumps in your mousse layer. This provides the “tang” and stability that prevents the dessert from becoming overly cloying.
Vanilla Bean Paste (1 tsp / 5ml): While extract works, paste provides those beautiful black vanilla bean specks visible in the white mousse layer. It adds a layer of floral complexity that elevates the entire profile.
Powdered Sugar (1/2 cup / 60g): We use powdered sugar instead of granulated to ensure the cream cheese layer remains perfectly smooth and velvety. The cornstarch in the powdered sugar also helps stabilize the mousse.
Heavy Whipping Cream (2.5 cups / 600ml): Divided for the mousse and the topping, this provides the “fluff” factor. Use cream with at least 36% fat content for the most stable peaks.
Dark Chocolate Chips (1/4 cup / 45g): These are melted with a splash of cream to create the “glossy drizzle” seen in the visual blueprint. This adds a rich, semi-sweet finish to the top.
The Tools You Need for Vertical Layer Perfection
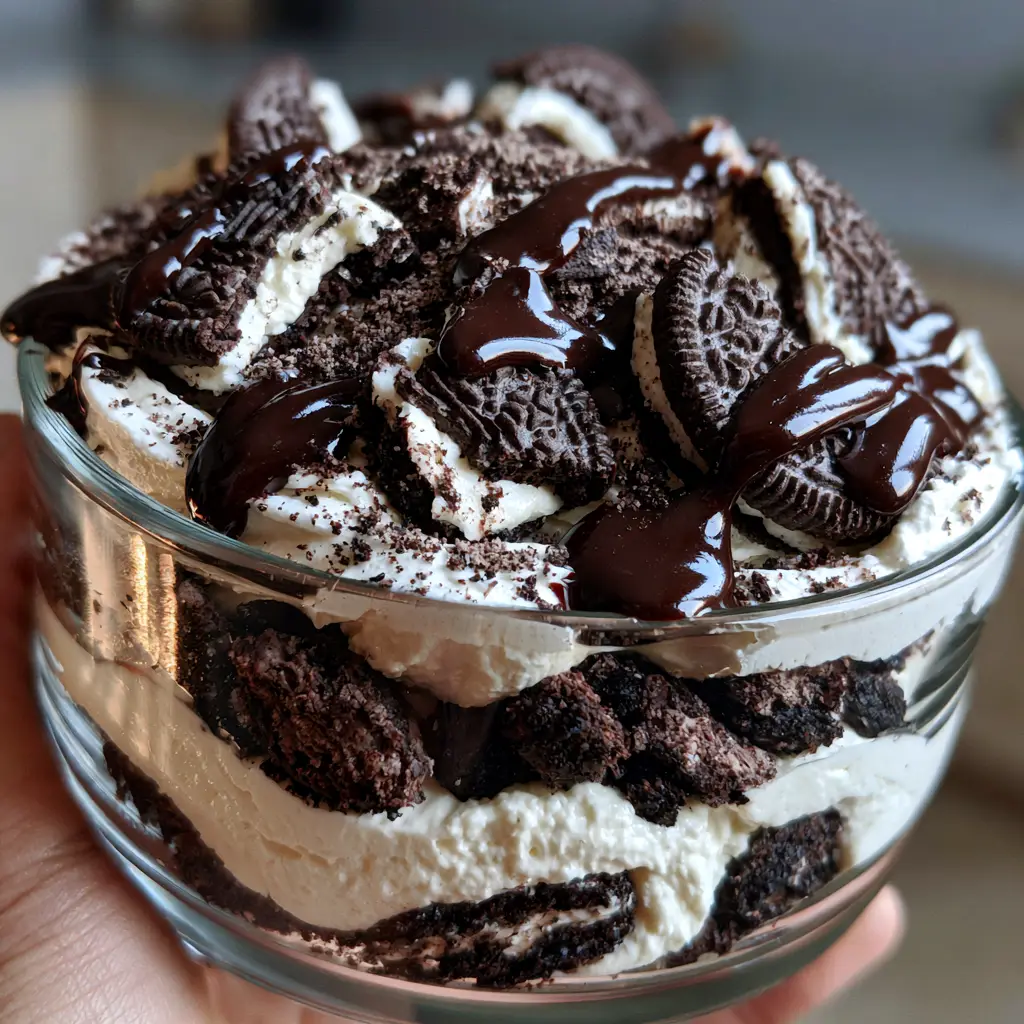
To achieve the look of a professional no bake oreo dessert, you need the right equipment to handle the different densities of the layers. A clear glass bowl or individual trifle glasses are essential for showing off those vertical stripes.
A high-powered food processor or a heavy rolling pin and a gallon-sized bag will help you achieve the three different cookie textures required. You’ll also want a sturdy stand mixer or handheld electric mixer to whip the heavy cream to stiff, stable peaks.
Lastly, an offset spatula is your best friend for smoothing out the cream cheese layer. This ensures the line between the white mousse and the dark base is sharp and clean, creating that “high-resolution” visual appeal.
Building the Foundation: How to Create the Coarse Cookie Base
The first step in any successful no bake oreo dessert is the crust, which provides the necessary structural support for the creamy layers above. Start by taking about 20 of your Oreo cookies and placing them in a heavy-duty freezer bag.
Using a rolling pin, crush the cookies until they are coarse chunks rather than a fine powder. You want to see distinct pieces of the white creme filling and dark cookie, as this creates the “rustic” look of the bottom layer.
Transfer the chunks to a bowl and pour in your 4 tbsp (56g) of melted butter. Toss gently until the cookies look like wet sand; then press them firmly into the bottom of your clear serving dish. Chill this in the freezer for 10 minutes to set while you move on to the next phase.
Whisking the Velvety Vanilla Bean Cream Cheese Mousse
In a large mixing bowl, beat the 8 oz (225g) of softened cream cheese with the 1/2 cup (60g) of powdered sugar and 1 tsp (5ml) of vanilla bean paste. You should see those tiny vanilla specks swirling through the white mixture.
In a separate chilled bowl, whip 1 cup (240ml) of the heavy cream until it reaches stiff peaks. This means when you lift the whisk, the cream stands straight up without drooping. Sensory cue: the cream will look matte and hold the pattern of the whisk perfectly.
Gently fold the whipped cream into the cream cheese mixture using a silicone spatula. Use a “cut and fold” motion to keep the air in the mousse, creating that dense yet velvety texture. Spread this over your chilled cookie base in one thick, even layer.
Achieving the Fluffy Whipped Cloud Topping
The top layer of this no bake oreo dessert needs to be lighter and fluffier than the mousse below to create a gradient of textures. Take your remaining 1.5 cups (360ml) of heavy cream and whip it with a tablespoon of powdered sugar.
Whip until the cream is voluminous and resembles soft white clouds. Unlike the mousse layer, this topping should look airy and “billowy.” Use a large spoon to dollop the cream onto the mousse, then swirl it gently for a natural, rustic appearance.
This “cloud” layer acts as the landing pad for your garnishes. It provides a stark white contrast to the dark chocolate elements that will complete the visual presentation.
The Art of the Garnish: Glossy Ganache and Cookie Dust
Now we execute the “Forensic Visual Accuracy” phase. Take 6-8 Oreos and break them by hand into large, irregular chunks, making sure the white creme filling is clearly visible. Place these vertically and horizontally into the whipped cream surface.
To create the glossy drizzle, melt your chocolate chips with 2 tbsp (30ml) of heavy cream in 15-second intervals in the microwave. Stir until it is thick and shiny. Drizzle this in a zig-zag pattern over the broken cookie pieces, allowing it to pool slightly in the crevices.
Finally, take 2-3 Oreos and pulse them in a blender until they become a fine “cookie dust.” Sprinkle this over the top of the entire dessert. This fine dust adds a professional finish and reinforces the deep cocoa aroma the moment someone leans in for a bite.
Culinary Secrets for No-Bake Success
- The Temperature Rule: Never try to whip cream cheese that is still cold; it will create “beads” of fat that ruin the velvety texture of the mousse.
- Chill Time is Non-Negotiable: While it only takes 15 minutes to assemble, this dessert needs at least 4 hours (ideally overnight) to allow the cookies to slightly soften and the layers to fuse.
- Stabilize Your Cream: If you are making this for an outdoor event, add a teaspoon of instant vanilla pudding mix to the whipped cream to help it hold its shape in warmer temperatures.
- Clean Slices: If serving from a rectangular dish, dip your knife in hot water and wipe it dry between every single cut for those perfect, sharp vertical layers.
Preserving the Crunch: Storage and Prep Ahead Tips
This no bake oreo dessert is a champion of longevity, but only if stored correctly. Keep the bowl tightly covered with plastic wrap or a fitted lid to prevent the cream from absorbing any “refrigerator smells” like onions or garlic.
It will stay fresh and delicious for up to 4 days. Interestingly, the cookies in the base will transition from “crunchy” to “cake-like” the longer it sits, which many people actually prefer. If you want maximum crunch, add the final garnish of broken cookies just before serving.
You can also freeze this dessert for a “frozen Oreo cake” experience! Simply wrap it in a double layer of foil and freeze for up to 2 weeks. Thaw in the fridge for 30 minutes before serving for a semi-frozen, ice-cream-like texture.
Perfect Pairings: What to Serve Alongside Your Oreo Delight
Since this dessert is incredibly rich and creamy, it pairs beautifully with items that offer a bit of acidity or a salty contrast. Consider serving it alongside a refreshing cucumber ranch salad to cleanse the palate between bites of chocolate.
If you are building a full no-bake spread for a party, this Oreo lush sits perfectly next to other chilled favorites like no-bake summer desserts or even a tangy key lime pie trifle.
For a savory-to-sweet transition, start your meal with bacon wrapped little smokies or a hearty southern potato salad. The saltiness of the bacon and the creaminess of the potato salad set the stage for the deep cocoa finish of the Oreo dessert.
Frequently Asked Questions
Absolutely! In fact, it’s recommended to make it at least 4-8 hours in advance so the layers have time to set and the flavors to meld together.
Yes, you can. However, Double Stuf Oreos contain more filling, which can make the base slightly softer. If you prefer a crunchier base, stick to standard Oreos.
The key is using vanilla bean paste rather than liquid extract. The paste contains the actual seeds from the vanilla pod, which provide that high-end gourmet look.
To achieve a glossy finish, melt the chocolate chips with a small amount of heavy cream (ganache style) rather than melting them alone, which can lead to a dull, matte finish.
Lumps usually occur if the cream cheese is too cold when mixed. Ensure it is completely softened to room temperature before beating it with the sugar.
The Ultimate No Bake Oreo Dessert Recipe Card
No Bake Oreo Dessert: The Ultimate 15-Minute Creamy Oreo Lush
Ingredients
Equipment
Method
- Coarsely crush 20 Oreos and mix with melted butter. Press into the bottom of a clear glass bowl.
- Beat softened cream cheese, powdered sugar, and vanilla bean paste. Fold in 1 cup of whipped heavy cream until velvety.
- Spread the mousse evenly over the cookie base, ensuring the white layer is visible through the glass.
- Whip the remaining heavy cream with 1 tbsp sugar until billowy. Dollop over the mousse layer.
- Top with broken Oreo chunks, a glossy chocolate drizzle, and a final sprinkle of fine cookie dust.
Notes
Chill for at least 4 hours to allow layers to set.
Closing & Call to Action
Creating a professional-grade no bake oreo dessert is all about the layers. By following this guide, you’ve mastered the art of the coarse cookie base, the vanilla bean mousse, and the glossy ganache finish. It’s a guaranteed crowd-pleaser that looks just as good as it tastes.
If you loved this recipe, please leave a comment below and let me know how yours turned out! Don’t forget to subscribe to our newsletter for more elite recipes and follow me on Pinterest for daily culinary inspiration.